
By Almighty
The actual work of takedown, replacement of
parts and reassembly.. takes only less than 20 minutes. I figure
the gun/or AEG unit would spend more time travelling if sent to
the dealer.
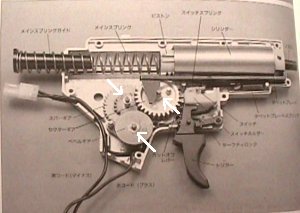
This is the inside of the AEG. The arrows point to where the bushings
are placed.

Here are the bushings, shown almost full size - these are the
metal replacements already.
Make sure the piston is in rest position by checking if feed nozzle
is forward. If not, fire gun several times until nozzle is forward.
To open AEG unit:
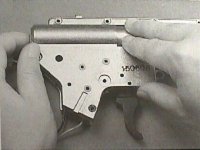

Lay AEG flat on table facing right. Remove all screws, and then
slowly pry top half off all around - keeping cylinder down with
your right index finger. This will keep the spring from buckling
and popping everything out.

Ease the (rear) spring guide out so as to relax
the spring, and then fully open the AEG.
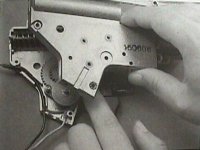
To close AEG unit:


Compress the spring and put into its proper position, pressing
down on it and the cylinder to keep it from buckling. This is
best done with the right index or middle finger through the opening
of the upper half of the AEG housing.
Slowly close the AEG halves together and align
the gear arxles with their respective holes.
By Bad_Bob on Monday, July 13, 1998 -
08:55 pm:
Almighty beat me by a few minutes, but I might
as well post this anyway (nice pics, btw!)
I bought a non-working MP5, and since I couldn't do any harm,
I tore the whole thing apart, including the gearbox. It was really
quite straightforward; arrange the screws and parts in a logical
sequence so you put them back in the proper spots (some have different
threads and lengths).
When cracking open the gearbox, once the initial spray of parts
subsides (from the mainspring releasing; it's really not *that*
bad =), pull the halves apart. Three reduction gears are there,
and the last two seemed awfully "grind-prone" to me,
so I stuck an extra washer under one of them to reduce the "overlap"
a bit.
Don't forget to clean all the black crap off the trigger contacts
while you've got it open!
The two NON-obvious things when reassembling: make sure the plastic
nipple thingy (which slides back to let a BB in) is positioned
properly, and check the little ratcheting lever on the first reduction
gear; you wouldn't want that thing to be out of place or it'll
chew up the motor's sprocket.
Oh yeah, if you're curious: I did actually get the thing
working.
I wouldn't recommend it to just anybody, but if you've
assembled RC cars, this is a really simple do-it-yourself job.
MINI airsofts, on the other hand, are a can of worms; I may NEVER
get my mini-M16 put back together =(